Today I have a special summer project for you! After being inspired by Pinterest (of course), I decided to make my own flip flop wreath! I created a spring wreath in March, and I realized the other day that I still had it hanging on my bedroom door. So, I decided to make a more seasonal one to hang up. Here is my Pinspiration:
You can find these pins
here,
here,
here, and
here.
Follow me on Pinterest
here.
For this project, you will need a medium-sized wreath form, six pairs of flip flops (the smallest size available- mine were XXS), a roll of duck tape that matches one of the flip flops, a hot glue gun, and a bouquet of fake flowers (all the same type).
To start off, wrap the entire wreath form in duck tape.
Next, cut six flowers off of the bouquet. Cut as close to the flower as possible.
Select one flip flop from each pair, making sure they are all either left or right shoes (I used right). Then, hot glue gun a flower to each of the six flip flops.
Finally, arrange all of the shoes equally around the wreath and hot glue them down. Secure some tulle for hanging the wreath up.
And there you go... a flip flop wreath!
My friend recently purchased a Zoku Duo Quick Pop Maker which you can find here on Amazon. I went over to her house today, and we made some delicious popsicles!
The Zoku maker is an insulated box that has spaces carved out for popsicles. Surrounding the popsicle holes is a metal material that helps freeze the popsicles quickly (the maker always stays in the freezer). To make the popsicles, you create a mix of blended fruit or fruit juice and water, and pour it into the Zoku maker. You can also add chunks of fruit. In less than 10 minutes, the popsicles are frozen and ready to eat!
For our first set, we made orange juice and lemonade popsicles. We used juice concentrate, but fruit juice would work too.
To begin, we combined about a spoonful each of orange juice and lemonade along with some water. You only need to make a little bit of the mixture for 2 popsicles.
Next, we placed the reusable plastic popsicle sticks in the slots that are designated for them.
Then we poured the mixture into the maker.
After filling, we placed the it in the freezer.
In seven minutes, the popsicles were ready!
To remove the popsicles, you twist a green handle around the stick. Then, you lift out the popsicle. You place it back in the maker, undo the green handle, and then take the popsicle out using the stick. This video demonstrates how.
YUM! For our second batch, we blended pineapple, water, and a little bit of sugar.
Then, we poured the mixture into the Zoku, and repeated the whole process again.
Voila!
The pineapple popsicles were delicious, but the orange juice and lemonade ones were kind of sour. The Zoku maker is such a cool idea, works really well, creates (pretty) healthy snacks, and is so fun to use! I'm definitely going to consider purchasing one.
Lately I have been pinning like crazy! If you don't already, you can follow me here on Pinterest. Today I'm going to share with you some of my recent favorite fashion, makeup, and hair pins.
Fashion
I think this chevron sundress is so adorable! I have been really into chevron lately, so I wish I had this in my closet.
This navy blue-themed outfit is perfect for summer. I love the tote bag, the flip-flops, and the necklace. I will probably assemble an outfit inspired by this pin.
I LOVE this bow pencil skirt from Forever 21. It would be perfect for a night out any time of the year!
This outfit is perfect for a casual summer day. As you probably know from this post, I love chambray shirts. I'm also really lovin' colored shorts this season.
Hair
This bandana + messy bun is the perfect casual updo for summer to keep hair out of your face.
This french-braided side ponytail is another pretty everyday look.
This style is fancier than the other two, but I love the long curls with a bow. I will definitely try this!
Makeup
This is a perfect subtle and shimmery smokey eye that is not over-the-top.
The white shadow over the gold creates a unique look that brightens the eyes.
I think this peach and pink look is very interesting. I'm not sure if I'm bold enough to wear it out, but I will definitley give it a go at home.
As usual, if you wish to repin anything, please click on the picture and repin directly from Pinterest. I hope you enjoyed this pinteresting post! :)
On Thursday my May Birchbox arrived, and, of course, I was very excited!
This month's Birchbox:
- Beauty Protector Leave-in Conditioner
- Coola Classic SPF 30 Cucumber Moisturizer for Face (sunscreen)
- Folle de Joie Perfume sample
- Sumita Color Contrast Eyeliner
- Yes to Grapefruit Daily Facial Scrub & Dark Spot Correcting Serum
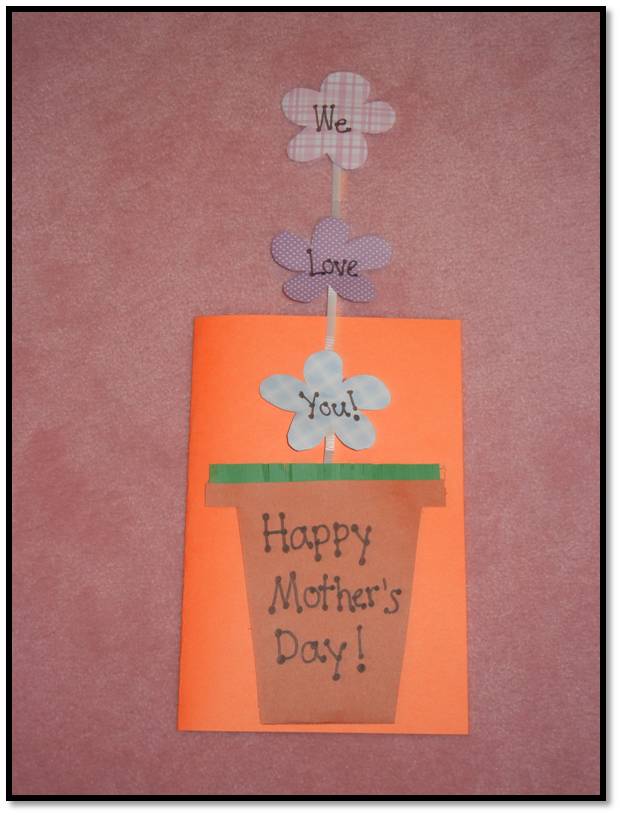
Happy Mother's Day! Today I'm going to share with you the card that I made for my wonderful mother this year.
Of course, I found the idea for the card on Pinterest. Here was my inspiration:
Click on the picture for step-by-step instructions from the original website. Click here to find it on Pinterest.
Here's how my version turned out:
The string of flowers are tucked inside the pot.
Inside the card I layered a couple pieces of scrapbook paper and wrote a note.
I made a few changes to the original craft:
- I used three flowers instead of four.
- I used patterned scrapbook paper for each flower.
- I glued the flowerpot onto a folded piece of construction paper.
- I used hot glue.
- I made the grass by cutting slits in a piece of green construction paper.
- I used ribbon instead of string to attach the flowers.
This is a cute and simple card that I would definitely recommend making!
Today I took a trip to the local outlets with my mom for a shopping afternoon. I didn't pick up a whole lot, but I did purchase three nice shirts!
First, I purchased this adorable pink chevron tank from American Eagle. It was 40% off!
Next, I snatched this black top from Aeropostale's sale rack.
Finally, this blue lace tank top also came from Aeropostale!
*TGIF! Happy weekend!*
As spring rolls around and the end of the school year approaches, there are all kinds of performances such as concerts, dance recitals, and drama productions. Today I am going to share with you what I keep in my makeup bag whenever I perform!
First, I store everything in this pink and green polka-dotted bag. It is the perfect size to carry around, yet it holds all of my stuff.
To start off my beauty routine, I wash my face and apply a light BB cream. I dab cover-up underneath my eyes and on any blemishes. Then, I rub on powder in circular motions to set the foundation and remove any extra shine.
Next, I move on to my eyelids. I first coat them with an eyelid primer, and then layer a glittery neutral highlighter that covers the entire lid and then the skin up to the eyebrow. Next I cover my eyelids with a gold shadow and fill in the creases with a dark brown. After I blend, blend, blend!
For my eyelashes, I curl them and then add a couple of coats of black mascara on both my top and bottom lashes.
I apply blush to the apples of my cheeks and blend it in a little. I usually use the pink blush in the bottom right corner of the palette.
Finally, I finish with a bright red lipstick that really pops on stage!