Tuesday, January 29, 2013

Smashbooks!

I LOVE my Smashbooks! If you've never heard of them, Smashbooks are basically spiral bound scrapbooks with a colored cloth spine made by K&Company. Each page is a different piece of deocorative paper, and there are no page sleeves. Smashbooks are about the size of an average magazine, so they are perfectly portable and great to do on-the-go. The idea is that Smashbooks don't have to be perfect- they can be filled with anything you want. Here is the video from K&Company that I think explains them pretty well:


There are many different styles of Smashbooks, and each one has different theme and a different colored spine. For example, there is a wedding one, a baby one, a retro one, an international one, etc. My first Smashbook, which I just recently completed, was the pretty style. Here is a picture of it:
 
 
Here are two example pages from my book. One is about my first birchbox, and one is a collage of magazine clippings.

My first Birchbox

Collage

I bought a new one the other day a Michael's (it was on sale), and it's the doodle style:


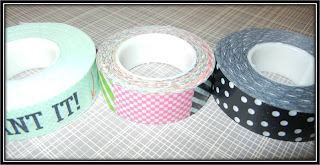
I haven't started it yet, but I can't wait to! You can grab the pretty style here and the doodle style here. All kinds of accesories are sold for Smashbooks, such as special tape, pockets, labels, and paper pads. Here are my three rolls of tape:


I have quite a few mini pockets and paper pads. Each paper pad has a theme (I have family, top 10, and travel), and is filled with little papers with prompts that you can rip out and stick right in your book. For example, the family pad has prompts such as "a typical family gathering looks like..." and "the time I got in huge trouble...". The pockets are good to glue onto a page and just stick random little things in them.


I also have larger pockets, calender pockets, and black brads with numbers on them.


I use solid-colored rectangles to mount pictures sometimes so that the page doesn't get too busy, and I also have decorative tags that are good for writing captions on.


I organize all of my Smashbook stuff in a purple caddy so that it is easily portable. I originally saw this idea online somewhere, but I'm not exactly sure where.


I keep all of my scrapbooking stickers in this bin:


All of the things that I am going to smash are stored in these two boxes:

Finally, Recollections has a sort-of knock-off brand of Smashbooks called Creative Chaos. Instead of being spiral bound, these books are mini binders that you can add and subtract paper from. I bought the travel style the other day to make a scrapbook of a vacation we took last spring.

Smashbooks are a really fun and easy way to scrapbook, and are definately one of my favorite things to use now!

Sunday, January 27, 2013

Cupcake Decorating

On Friday, a bunch of my friends and I got together and decorated cupcakes! It was so much fun and we all had a blast! I created three special cupcakes, and all of the ideas were taken from the "Hello Cupcake" line of books. If you haven't checked out these books, you definitely should. They are chock-full of absolutely amazing, creative, and adorable ideas for decorating all kinds of themed cupcakes. Anyways, here is what I created (I also frosted a few more, but they were nothing special).

First up is my fish cupcake. I first frosted a plain vanilla cupcake with purple frosting. Then, I lined skittles up in three rows for the scales and stuck a dot candy in the end for a tail. Finally, I used a candy eye and a skittle for the face. So simple and fun!


Next, for this sunflower cupcake, I frosted another vanilla cupcake with green icing and placed an oreo on top. Then, using yellow frosting, I piped the petals onto the oreo. For a finishing touch, I added a red skittle with chocolate frosting dots as a ladybug. To pipe the petals, I filled a small plastic bag with the frosting. Then, I snipped a tiny hole in the corner of the bag and used that for the piping. The best part? You can just throw the bag away when you're done and there's no mess or cleanup!

Finally, here is my sleepover girl cupcake! I frosted a vanilla cupcake with green icing and layed down two mini vanilla wafers (one for the body under the blanket and one I frosted white for the pillow). Then, I put another vanilla wafer on top of the pillow for the girl's face. The blanket is made out of a red and a yellow starburst that I microved for 30 seconds and molded into the desired shape. The top of the blanket is an airhead candy strip. To finish this cupcake, I used candy eyes and piped the nose, mouth, and hair.

I hope this post has inspired you to decorate your own cupcakes! Check out My Crafting Bee and Create and Bake, which also have great posts on this cupcake decorating event!


Monday, January 21, 2013

Misc. Monday

The other day, I rearranged/ reorganized my makeup drawers.
Before

After

Some cute new accessories:
Sparkly Headband

Bow Tights

On Friday, I went to Jo-Ann's Fabric and dug through the clearance boxes. I found the Smashbook calenders for $0.97, the Smashbook numbers for $0.97, the Mexican stickers for $0.50, and the tags for $0.25.

Valentine's Day candy!
Jumbo Heart Marshmallows, Chocolate Mint Marshmallows, Regular Hershey Kisses, Caramel Hershey Kisses, Conversation Hearts, and Chocolate Mint Hot Cocoa mix

Happy Martin Luther King Day!

Sunday, January 20, 2013

Outlet Shopping

Since it was a long weekend, we decided to go outlet shopping! I was super impressed with all of the stores and sales going on, and it was so much fun!
Lots of bags!

North Face Fleece

Shirts from Aeropostale (those are two camis in the middle)- the orange is not as bright in person : ) 

Skirt from Abercrombie & Fitch

Happy long weekend!

Friday, January 18, 2013

January 2013 Birchbox

I received my January Birchbox towards the beginning of the month. Overall, I was happy with it, but I didn't love it quite as much as the December one. Here is what was in it:


1. Vinexpert Radiance Day Cream SPF 15 (daily moisturizer)
2. Viva La Juicy (perfume sample)
3. Number 4 Clarifying Shampoo
4. Put a Lid On It Eyelid Primer
5. 2 Lotion Samples

I feel like this month's didn't have as much in it as last month's did. However, I am still happy with it and can't wait to use everything!

Wednesday, January 16, 2013

Cupcake Pen Review


One of my new favorite tools for baking is called a cupcake pen. It's basically a long tube with a spout at the top and a removable bottom. To use it, you cover the top (it comes with a cover) and fill the tube from the bottom with cupcake batter. When you're filling cupcake liners, you just squeeze the tube and the batter comes right out into the pan, mess-free. It actually works really well! 


My cupcake pen filled with batter from mint-chocolate cupcakes

I bought mine at HomeGoods, but you can also pick it up here at amazon.

Monday, January 14, 2013

Mint- Colored Nails

On Sunday, I painted my nails using "Mint Sorbet" by Sally Hansen.


I LOVE this nail polish, but for some reason every little mistake is super obvious using this color. I added some wavy stripes using a white nail brush on each thumb. Here is the finished product:


Here are two tutorials for nail art that I definitely want to try from the Birchbox website:

1. How To: Polka Dot Manicure


2. How To: DIY Chevron Nail Art


If you haven't checked out the Birchbox website, you definitely should! Under the "magazine" tab, there's tons of beauty/ nails/ makeup tutorials and articles free to everyone. Finally, this at home DIY manicure set looks interesting. Sort of expensive (and supposedly doesn't stay on as long as a gel salon manicure), but I guess it's cheaper than getting gel manicures in a salon!

Also, check it out here on amazon.com


Sunday, January 13, 2013

Mint-Chocolate Cupcakes

Today I made mint-chocolate cupcakes from this recipe. Instead of the mint buttercream frosting, I used canned Betty Crocker icing and just added peppermint extract. I sprinkled the frosted cupcakes with mint-chocolate chips. For me, the recipe made 12 mini cupcakes, 9 regular cupcakes, and one mini cake (which I forgot to take a picture of). They turned out pretty good!

Ingredients


Mixing the Batter
Into the Oven


Fresh out of the Oven

Cooling

Finished! (As you can see, I didn't spend much time decorating!)

*Have a great week!*


Saturday, January 12, 2013

December 2012 Birchbox

For Christmas, one of my favorite gifts I received was a 6-month Birchbox subscription. For those of you who have never heard of Birchbox, it is a company that sends subscribers a small box full of makeup/ beauty samples for a fee of $10 per month (you receive one box a month). This was my first subscription, and so far I love it! The first box actually came in the mail a couple of weeks before Christmas, but I put it under the tree and opened it on Christmas morning. Here is what was in the box:


1. Obliphica Nourishing Mask (for hair)
2. Put a Pin in it Rose (nail polish)
3. Yogini (perfume sample)
4. Mary-Lou Manizer (eye shadow)
5. Hair Tie
6. Tili Bag (adorable turquoise plastic zip bag)
7. Coupon for $50 off a purchase of $125 or more at "Rent the Runway"

I highly recommend Birchbox if you're into makeup/ beauty! Here is a great video from their website that explains more about them.


Sunday, January 6, 2013

Pinterest Styles

Nothing much to blog about today, so I'll just leave you with some of my new favorite outfit pins via Pinterest!


White Shirt with Navy Blue Skirt


Pinned Image
Lace Outfit


Pinned Image
Navy Bow Tank

Pinned Image
Cozy Skirt Outfit

Pinned Image
Summer Pink and Black

*If you want to repin any of these images, please do so by clicking on the links and pinning them from Pinterest. Thanks!


Saturday, January 5, 2013

Welcome!

Welcome to my blog- my adventures in fashion, baking, and crafting! I love to paint my nails, bake sweets, put together new outfits, scrapbook, and create new things. Enjoy!