Showing posts with label Summer. Show all posts

Saturday, September 14, 2013

Bikini Bonanza

This morning I was cruising around Sears at our local mall when I happened upon the most amazing thing ever- racks and racks of adorable bikinis on CLEARANCE! However, the best part was that each bikini piece was... drum roll please... only $2.99 each! That is such a bargain! I couldn't resist this unbelievable end-of-season sale, so I picked up three complete bikinis for a total of $18.

This unique bathing suit has colorful rhinestones on the top and stripes on the bottom. I love it!


I love the bead work on this bikini top! It's so adorable.

Finally, I purchased this pink and orange bikini. It's kind of hard to tell in the picture, but it has lace detailing that form zebra stripes.

That's it for today! Check out this link to see all the bikinis at Sears.com!

Saturday, August 3, 2013

S'More Cookies

Wow- long time, no blog! It's been almost a month since my last post! Summer is a busy time of year.

At the end of June, I attended a beginning of summer party, and I made and brought some of these delicious s'more cookies. You can find the original recipe here, and the pin here.

To make these cookies, you first whip up a batch of dough using chocolate chips, mini marshmallows, cinnamon, and other basic baking ingredients (I had to substitute chopped regular marshmallows since I didn't have any mini ones). Then, you lay graham crackers on a cookie sheet and place a rolled piece of dough on top of each one.


Next, you bake the cookies for about 5 minutes. At the five-minute mark, you take the try out from the oven and press a piece of a Hershey's bar onto each cookie. The tray then goes back into the oven for about 5-7 minutes.
Pressing the Hershey's Bar in
 
 
Finally, allow the cookies to cool and enjoy!


Check out my s'mores board on Pinterest for tons of other delicious-looking recipes using the classic idea of graham crackers, marshmallows, and chocolate!

Saturday, July 6, 2013

Anchors Away! Summer Nails

Happy summer everybody! When I was painting my nails the other day, I was inspired to do a nautical theme. Here is the outcome:

Anchors away! First I painted all of my fingers a base coat of yellow. Then, on the ring fingers I did blue stripes and on the thumbs I drew anchors. To create the stripes and anchors, I dipped a bobby pin into the nail polish bottle and drew the designs on the nails. When doing designs, always remember to put on a clear top coat. This is always good to do, but it is especially important for designs so they don't immediately chip off.

Have a great weekend!

Thursday, July 4, 2013

Happy Fourth of July!

Happy Fourth of July!!!!!!! I hope everybody is having a great time celebrating our country's birthday! Today I'm going to share my patriotic nails for this year and some Pinterest baking ideas.

Yesterday afternoon I painted my nails the colors of our flag to get me in a festive mood. The middle fingers and thumbs are red, the pinkies and index fingers are blue, and the ring fingers are sparkly white.


I didn't bake anything spectacular for the Fourth, but there's always next year! Below are some patriotic baking ideas that I would love to try someday (all from Pinterest, of course)!

 
This flag made out of star cookies is so cool!

These kabobs are made out of brownie bits, marshmallows, blueberries, strawberries, and a chocolate drizzle.

This layered cupcake is awesome! I love the sprinkles and the decoration on top.

As always, to repin anything, click on the picture and it will bring you directly to the pin on Pinterest.

***I hope everybody has a happy and safe Fourth of July!***


Friday, May 31, 2013

DIY Flip Flop Wreath

Today I have a special summer project for you! After being inspired by Pinterest (of course), I decided to make my own flip flop wreath! I created a spring wreath in March, and I realized the other day that I still had it hanging on my bedroom door. So, I decided to make a more seasonal one to hang up. Here is my Pinspiration:

You can find these pins here, here, here, and here.
Follow me on Pinterest here.

For this project, you will need a medium-sized wreath form, six pairs of flip flops (the smallest size available- mine were XXS), a roll of duck tape that matches one of the flip flops, a hot glue gun, and a bouquet of fake flowers (all the same type).


To start off, wrap the entire wreath form in duck tape.


Next, cut six flowers off of the bouquet. Cut as close to the flower as possible.


Select one flip flop from each pair, making sure they are all either left or right shoes (I used right). Then, hot glue gun a flower to each of the six flip flops.


Finally, arrange all of the shoes equally around the wreath and hot glue them down. Secure some tulle for hanging the wreath up.


And there you go... a flip flop wreath!

Sunday, May 26, 2013

Zoku Popsicles

My friend recently purchased a Zoku Duo Quick Pop Maker which you can find here on Amazon. I went over to her house today, and we made some delicious popsicles!


The Zoku maker is an insulated box that has spaces carved out for popsicles. Surrounding the popsicle holes is a metal material that helps freeze the popsicles quickly (the maker always stays in the freezer). To make the popsicles, you create a mix of blended fruit or fruit juice and water, and pour it into the Zoku maker. You can also add chunks of fruit. In less than 10 minutes, the popsicles are frozen and ready to eat!


For our first set, we made orange juice and lemonade popsicles. We used juice concentrate, but fruit juice would work too.


To begin, we combined about a spoonful each of orange juice and lemonade along with some water. You only need to make a little bit of the mixture for 2 popsicles.


Next, we placed the reusable plastic popsicle sticks in the slots that are designated for them.


Then we poured the mixture into the maker.
 

After filling, we placed the it in the freezer.


In seven minutes, the popsicles were ready!


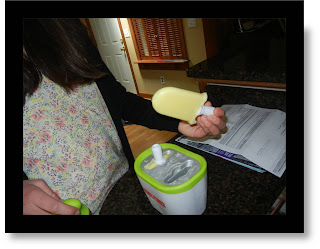
To remove the popsicles, you twist a green handle around the stick. Then, you lift out the popsicle. You place it back in the maker, undo the green handle, and then take the popsicle out using the stick. This video demonstrates how.


YUM! For our second batch, we blended pineapple, water, and a little bit of sugar.


Then, we poured the mixture into the Zoku, and repeated the whole process again.


Voila!


The pineapple popsicles were delicious, but the orange juice and lemonade ones were kind of sour. The Zoku maker is such a cool idea, works really well, creates (pretty) healthy snacks, and is so fun to use! I'm definitely going to consider purchasing one.